Decorating with Antiques: Door Plates and Fashion Plates

Collage of antique door hardware and vintage fashion plates

Corbin rim lock and vintage door plate

A 19th-Century Corbin rim lock with a 1930s door plate. Each is supported by small nails.

Here’s a fun way to integrate a variety of small decor items — my friend Erin did this for me shortly after I moved into this house.  We have here some Eastlake hinges from the 1880s, antique monogrammed doorknobs, an 1880s Corbin rim lock, an Art Nouveau doorplate, and a 1930s doorplate, interspersed with a variety of antique and vintage fashion plates and two gorgeous oil paintings that a friend back home painted for me.

Decorating with antique doorknobs

Antique doorknobs (top) can be mounted by hanging each knob on a long nail through the opening in the back.

Everything was quite simple to hang — antique doorknobs have a square opening in their stems and were hung from long nails; the hinges took a nail through one hole in each leaf; and the plates are hanging by their doorknob openings.

To maintain a balanced look within an asymmetrical arrangement, Erin composed five columns.  As you can see, the greatest visual weight is in the center, with the smallest items farthest from center.  The pair of matching oil paintings was split up with one in the lower left and one in the upper right corner; a pair of oval fashion plates (1960s reprints of 19th Century plates) was split and placed in the other two corners of the group.  This helps to pull the entire composition together.IMG_1062 Reading Hardware "Nouvelle" door plate

Far left: A cast iron hinge with a small oil painting.

Near left: “Nouvelle” door plate by Reading Hardware, circa 1910.


When hanging mismatched items, here are some helpful tips to remember:

  • Make sure the composition is balanced.  You don’t want it to feel heavier on one side than the other.
  • Repeat elements of the composition (pairs of hinges, pairs of matched frames, et cetera) for a unified look.
  • Make sure your pieces harmonize with each other.  I had a couple other fashion plates that I wanted to use, but they were in very plain, light wood frames and didn’t work with this particular grouping.  Likewise, we stuck with all dark-colored door hardware in cast iron and a dark japanned finish, and omitted my glass doorknobs and brass plates.
  • Work in units.  It was easier to create this grouping by breaking it down into manageable sections, rather than trying to put everything together all at once.

If you’re looking for antique hardware, try Preservation Station. They’re fabulous people (I worked for them until I moved away to grad school), and they’ve got a great selection.

Posted in Antiquing Adventures, Decorating, Mrs. Armstead's Household Guide | Leave a comment

Donating Old Sewing Supplies

I was at my local Salvation Army the other day — they have the best prices in town for dresses, you know — and I wondered suddenly why I hadn’t seen any sewing patterns there.  So I asked.  The answer?  My local Salvation Army sends all sewing patterns to RECYCLING.  As in, turned into paper pulp and destroyed.  They do the same thing with fabric.

“We don’t get in a ton of them,” the cashier said helpfully, “just, like, when someone dies and all their stuff gets donated.”  I was standing there open-mouthed in horror — because, as any vintage sewing junkie knows, the very nicest — and most valuable — sewing patterns are the ones that have been stashed in someone’s house for fifty years: in other words, the very patterns that the cashier was talking about.

I offered to buy all the patterns they got in — ALL OF THEM — and they wouldn’t do it.  They didn’t have time to call me when they got any, they said.  So I offered to come by, say, once a week to retrieve any patterns (and to pay for them, mind you).  No go.  The manager wouldn’t even come out to talk to me about it.  So I emailed the regional headquarters — twice.  After three weeks, they still have not replied to my emails.

Besides being wasteful and detrimental to the preservation of historic items, this is not environmentally friendly behavior — as we all know, REUSE always comes before RECYCLE.  Recycling things that can be reused is a waste of resources.

If this wanton destruction of fashion history horrifies you (and it should), here’s what you should do:

  1. Email your regional Salvation Army and request that they start carrying sewing patterns in their stores instead of recycling them.
  2. In the meantime, tell all your friends and family NOT to donate sewing supplies to Salvation Army.
  3. If you have old sewing supplies that you want to get rid of, either contact me 😉 or take them to a small local thrift store.

UPDATE 4/24: I just found out that a few Salvation Army stores — the Pittsburgh, PA, store and one in Wisconsin — do annual sales of sewing supplies, so not all the stores destroy patterns. But if you’re donating sewing supplies, DO ask before you leave them!!

I’ve also heard from one of my vintage pattern friends on Facebook that some Goodwill stores also do not accept patterns — if you take anything there, check before you drop it off.

If you have things to donate and aren’t sure where to send them, here are some examples of places that accept patterns and sewing supplies:

  • For the Nashville, TN, area — Thriftsmart takes sewing patterns and offers sewing classes.
  • For the Athens, GA, area — Project Safe sells fabric — even fabric scraps! — and patterns. All the proceeds help abused women and children.
  • For the Tullahoma, TN, area — Attic Outlet sells patterns and fabric.

Again, most small local thrift stores sell sewing patterns — if you know any others that do, feel free to leave a comment!

Posted in Antiquing Adventures, Ruminating, Reminiscing, & Rambling | Tagged , , , , , , | 14 Comments

Two Excellent & Easy Recipes for Macaroni and Cheese

Finding a good macaroni and cheese recipe became a little bit of an obsession while I was in college.  I finally got one — actually, I got two.  Today I wanted to share these two macaroni and cheese recipes with y’all.  Why two?  I like having multiple good recipes for one item.  I don’t always plan my menus ahead, and sometimes which recipe I use depends on which items I happen to have on hand.

Classic Macaroni and Cheese

This is a good basic, made from a traditional medium white sauce with the addition of a little dry mustard for some extra flavor.

Serves about 3-4 as a side dish.

  • 2 Tbsp. butter
  • 2 Tbsp. flour
  • 1/4 tsp. salt
  • 1/2 tsp. dry mustard
  • 1 c. milk
  • 1 c. cheese
  • 1/2 box of macaroni or whatever pasta shape you prefer

Cook and drain pasta according to package directions.  Do not rinse.  In small pot over medium heat, melt butter.  Whisk in flour, salt, and dry mustard; add milk (this makes a medium white sauce).  Cook and stir over medium heat until thickened.  Add approx. of grated cheese (I generally use cheddar, but other types work, too) and stir until melted.  Stir cooked pasta and sauce together in a Corning Ware or other oven-safe dish.  Can be served as-is immediately, or top with a little more cheese and bake, covered, at 350 degrees up to 25 minutes if desired (this can be a good trick if your macaroni is finished before your other dishes).

Creamy Macaroni and Cheese

This was adapted from a recipe from my friend Clair.  I made it at my parents’ house over Christmas, and my dad said it was the best mac-and-cheese he’d ever had.  I think it’s my new favorite too.

Approx. 6-8 servings as a side dish.

  • 1 can cheddar cheese soup
  • 1-1/2 c. milk
  • 2 c. grated cheese (I used cheddar; use whatever you prefer)
  • Approx. 1-1/2 c. sour cream
  • 1 box macaroni or whatever pasta shape you prefer

Cook and drain pasta according to package directions.  Do not rinse.  In small pot over medium heat, whisk together cheddar cheese soup and milk until hot; add sour cream and cheese and whisk until combined and melted.  Stir cooked pasta and sauce together in a Corning Ware or other oven-safe dish.  Can be served as-is immediately, or top with a little more cheese (optional) and bake, covered, at 300-350 degrees up to 30 minutes.

Posted in In the Kitchen, Side Dishes | Leave a comment

Is Barbie an Unrealistic Menace? Evaluating Barbie in the Historic Context of the New Look

Barbie gets a bad rap these days.  She’s mocked for her body shape.  She’s translated into “real measurements” ad infinitum.  Mothers refuse to let their daughters play with Barbie because they might catch a “bad body image” from her.  Barbie is anti-feminist.  Barbie makes women feel bad.  Barbie is evil.  We’ve all heard it — over, and over, and over.  And it’s getting old.  When we look at Barbie qualitatively — from a dressmaking perspective and an historic perspective, instead of just “by the numbers,” an alternate picture presents itself.

First of all, let’s take a quick look at Barbie’s careers.  Feminists should love Barbie, really.  According to this article, Barbie has over 130 careers, even running for President before any other woman.  If there’s any doll that might influence a girl to be everything she can possibly be, it’s Barbie.

With that out of the way, let’s talk about what Barbie looks like with clothes. All the measurements on Barbie are taken sans clothing — and it’s a distortion.  The other day, I came across this great blog post that does a visual comparison of Barbie’s waistline with and without her clothes. I quote Amanda:

“Do you know why Barbie . . . has such a small waist? Proportion and scale. Fabric doesn’t scale down that much. Once the clothes are around that tiny waist, she begins to look more “normal” because the seams around the waist add bulk.”

There are only so many things you can do to shrink Barbie clothes. As Amanda observed, fabric has to be a certain thickness.  We can’t dress Barbie in tissue paper.  In addition, clothes really can’t be made — in any size — with less than 1/4″ seam allowance.  If you check out the interior side seam of any T-shirt in your dresser drawer, you’ll find that the seam allowance is probably 1/4″.  This means that you and Barbie have the same seam allowance on your clothes.  Let me translate that: Regardless of the significant size difference between you and Barbie, you both have same amount of excess fabric taking up space on the interior of the garment.  On an 11-1/2″ doll, that’s a lot of bulk.

Let’s look at Barbie — dressed, since we’re civilized people and don’t judge others by how they look unclothed — and compare her to some other images.

2012-02-08-Barbie6edit.jpgAbove, here’s a photo of Barbie, in one of her original dresses from 1960.  Please note that she looks quite normal (and if you click the picture, it takes you to the article where I found it — quite a fun read).

https://i0.wp.com/sewingpatternheaven.com/wp-content/uploads/2013/04/Simplicity-1446-1.jpgNow here’s a women’s sewing pattern that’s nearly identical to Barbie’s dress shown above (again, linked to the source — decent price for an adorable vintage sewing pattern, too).

Do notice that Barbie in the first photo is much more realistically proportioned than the drawing on the sewing pattern envelope.

Now, here’s something else to think about. In 1959, when Barbie came out, the New Look was still in full force in popular American fashion. Let’s run a Google Image search for “New Look.”

New-Look-Hero.jpgHere’s our number one result, from Vogue.com, depicting a woman in a Dior outfit. Does her silhouette remind you of anyone we know? A plastic, 11-1/2″ someone?

The New Look was introduced in 1947 — a very feminine fashion that reacted against the restricted styles of WWII.  It consisted of a full bust, a very fitted waist, and either a full skirt (pictured above) or a slim-fitting pencil skirt.  This silhouette — the hourglass shape — dominated fashion from 1947 into the early 1960s.  It was THE fashion of the era.

Barbie’s shape wasn’t some diabolical scheme to make girls feel bad about their bodies. Barbie was simply the New Look, in doll form.

Now, here’s something else about the New Look — achieving this look typically required the use of various undergarments for shape.  Full skirts were achieved by petticoats; tiny waists were shaped by girdles; and full busts required uplifting bras, extra fullness in the bodice, and sometimes even padding.  But who puts girdles and bras on dolls?  Barbie is just the woman of the 1950s with all of her supporting undergarments already incorporated into her shape. Dressed, Barbie looks like Mary Tyler Moore, Donna Reed, Marilyn Monroe, or even Andy Griffith’s girlfriend Ellie (if you don’t believe me, look them up!). And when was the last time we kept a girl from watching Andy Griffith because it might be “injurious to her self esteem”? Yeah, right.

With all the Photoshopping that we see in magazines or Photoshopped ads from Target, don’t you think maybe we’re overreacting a little bit to Barbie’s historic New Look figure?  If I had a daughter and were choosing whether to let her watch television, look at a magazine, or play with Barbies, I’d rather her be playing with Barbies any day.  Barbie is a woman in good shape, yes — no one would mistake her for being portly — but an unrealistic woman?  Not when you look at her in her historic context.

Posted in Ruminating, Reminiscing, & Rambling | Tagged , , , , , | 2 Comments

How to Create a Sewing Pattern Inventory Database

I am pleased to announce that, after hours of research and experimentation, I have finally found what I consider to be the perfect solution to my years-old question of “how do I organize my sewing patterns??”

The quick answer: Evernote.  For a more detailed explanation, keep reading.

I have over 500 sewing patterns (432 cataloged at present, not counting the ones I found that I somehow had forgotten to catalog, and I just bought a box of, oh, maybe 85 or 90 more a couple weeks ago because they were an incredible bargain). After coming home with those 85-90 new patterns, I decided that I had to do SOMETHING.

Previously, I had tried using a Microsoft Works database — Microsoft, however, decided to discontinue Works, so I had to go through an arduous process to convert my database to Excel. In that arduous process, I lost some information (can you see my lovely size “41386” on the vintage Bridal Elegance pattern below? Yeah, I don’t know what that means either. It actually said something back when it was in Works).

Screenshot of Excel sewing pattern database.

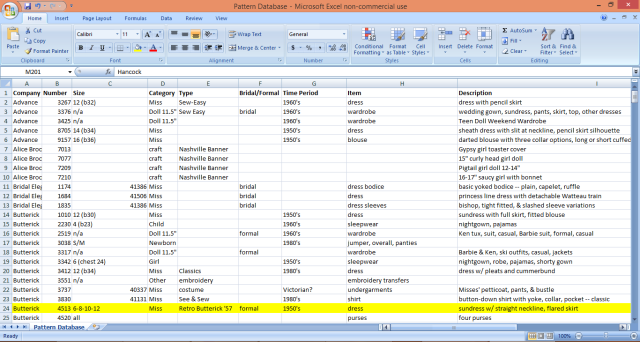
My Excel sewing pattern database.

But here’s my problem: I’m a very visual person, and the description “dress with pencil skirt” means very, very little to me. And that was all I had in Excel. So any time I wanted to find a pattern, I went and dug through boxes. Lots of boxes. Five hundred patterns’ worth of boxes.

I experimented with several different options in my search for pattern inventory nirvana.  One of the first things I tried was Pattern-File.  They have a very cool program, and it has a great feature whereby you can enter a pattern number, and (most of the time) it will pop up the pattern and enter it for you.  This saves a LOT of time.  The drawback for me, however, is that I’m a grad student on a grad student budget; while Pattern-File is very reasonably priced ($4.99 per month), I don’t like being tied into another monthly or annual bill. The other drawback, for me, is that I’m a bit of a control freak, and I like to be able to include all the information; as of February 2014, Pattern-File has no feature to list where a pattern came from or how much you paid, and the inclusion of that information was important to me (I love being able to look at my records and say, “Oh, look, Mrs. Peggy gave me that one! I had forgotten that!”). So I kept looking.

After several evenings shirking homework to research this problem, I downloaded Evernote.  It’s a very versatile program, it’s free (up to a point — I’ll explain that shortly), and it automatically backs up your stuff online every few minutes. It’s also saved to your computer, though, so you can do everything offline if necessary. Evernote can be accessed anywhere, and can be synchronized with a smartphone. So if you’re in the fabric store and Simplicity patterns are 99 cents and you can’t remember what you have, you can look it up very easily.  Evernote is very intuitive and easy to use, and has great search capability.

You can upload up to a certain number of megabytes per month, or pay $4.99 per month to upload up to 1gb per month. Normally, I think the basic free version will be quite sufficient; right now, though, since I’m uploading so many patterns, I bought one month of the premium version. I believe it’s a bargain. Once the data has been uploaded, they store it for you; it’s just the uploading itself that counts towards your monthly quota. Once I’m done entering the patterns and just enter the few that I buy every month or two, I should be just fine with the free version.

Here’s a screenshot of my Evernote account as it looks right now on my computer:

Evernote pattern database

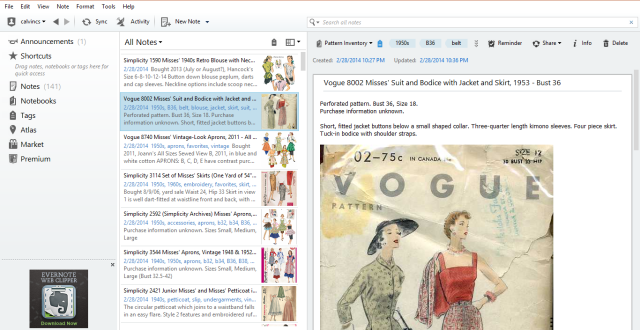
Evernote pattern database.

When processing a pattern, I enter the title (company, pattern number, pattern title, date, and size), add all my purchase information (when, where, from whom, and how much I paid), typically add the brief description of the pattern from the back, and then add a picture of the front and back of the pattern.  Evernote has this great feature whereby you can drag a picture from any website directly into your “note,” and it will save it for you. So I just do a Google search for, say, “Vogue 8002,” and then drag in the picture. If it’s a pattern that’s still available, it’s even easier; you just drag the pictures and yardage requirements from the manufacturer’s website. Some manufacturers include their yardage as PDFs, and that’s okay too — you can attach the PDF in Evernote and it will show up just like a picture.  The last thing I do is add tags, which help with searching. This Vogue 8002, for instance, is tagged with the following: “B36, vintage, suit, 1950s, belt, blouse, top, skirt, jacket, favorite.” If I search for any one of those terms — or any of the words in the pattern description — Evernote will find all the patterns that match it.  Tags could also be utilized to aid in pattern organization (i.e., “Box 1, Box 2”), but I haven’t gotten that far yet.

Another helpful feature of Evernote is that you can divide it into different “Notebooks.” I currently have one notebook for all my patterns (I felt that, since Evernote is so search-friendly, only one notebook was necessary), and a second notebook for cataloging my historic photographs that I’m using for research (I buy a photo on eBay, drag the picture from the eBay listing over into Evernote, and there it is).

But back to the patterns — if you’re thorough in making sure you have all the yardages and other information entered, you could also take your Evernote with you to the fabric store.  This way, when you find that perfect fabric, you know exactly how much you should buy — and what size zipper it wants.

By the way, if you decide you want to try it out, I’d be very happy if you use my link from this page — I’ll get a month of the Evernote Premium free if you decide to try it out through the link. (I would like to note, however, that I discovered this AFTER deciding to write this article — I was writing it anyway, and that was just a nice little bonus!)

All in all, I’m perfectly thrilled my new system. It might even make me finally break down and get a smartphone.

UPDATE 3/26/14: I just discovered that you can show folders publicly by sending anyone a link — pretty fantastic feature if you want to show your friends which patterns you’ve got. 🙂

UPDATE 1/11/19: Another fabulous thing about Evernote is that you can sync it among multiple devices. My patterns live in my computer, my phone, and my iPad, which makes it easier to do fabric shopping on the go!

Posted in How-To, Mrs. Armstead's Household Guide, Organization, The Lady's Workbasket | Tagged , , | 25 Comments

Fabulous Finds and Life Lessons from an Estate Sale

The Sale

My mom came to visit this weekend as a belated birthday present. Sewing/antique junkies that we are, we decided yesterday morning to head over to an antique store the next town over. As we were driving down the highway, we passed an estate sale sign — naturally, we made a U-turn. Lo and behold, it was the last day of the sale, and they were starting an auction in fifteen minutes to get rid of every last bit. A quick detour turned into an estate shopping marathon.  All the cheapskates were there, having grand fun. I was the youngest person present, and became somewhat popular. According to one man I was chatting with as I collected my finds, no one seriously bid against me on certain items because they all thought I was cute. Apparently they also all thought I was about seventeen years old (I’m 26).

As is usually the case, the estate sale was a paradoxical event — happy and sad, simultaneously. You can’t help but be thrilled that you’re getting some amazing buys, but sad when you see the boxes of 1940s pictures of their friends, unlabeled and going for three dollars; the hand-painted oil portrait of the daughter with no takers at ten dollars; the musty books in the basement — ALL OF THEM — for $7.50. The c. 1970s Viking sewing machine for $2 (which killed me, but I just can’t buy another sewing machine. And I couldn’t buy it for resale either, because — let’s face it — I would never actually part with it).

The Finds

My finds? I bought three big boxes of fabric for $6. I almost didn’t, because I hadn’t looked through them beforehand — I flipped through it in the middle of bidding, spotted a brocade, and then HAD to have it.  I bought an early 1900s book for a quarter, off the guy who had bought the entire bookcase for $7.50.  My mom bought a bed for the guest room — $5 — a pile of wool blankets, also $5. Then it moved upstairs — I bought eight hatpins for $5. The ENTIRE CLOSET — shoe rack, TV stand, dozens of scarves and belts, all the clothes, shoes, and purses — for $8.  And the treasure of all of it — a 1942 wedding dress, a veil, an 1890s yellow silk baby dress, a 1950s silk shirtwaist dress with belt, and a modern beaded formal dress — ALL FOR FIVE DOLLARS FOR THE LOT.  I think the auctioneer almost had a conniption.

In addition to all this, a sweet lady named Kristin, who found out that I’m a fashion student, gave me a three-ring notebook full of clippings from 1950s magazines from a bundle of books she had bought — she refused to take a penny for it. Another lady gave me a 1903 fashion magazine — she had bought the entire table of stuff in the bedroom.

Moomer and I loaded up all the finds (wonderful mother that she is, she loaded up most of it while I was having my drama over the $5 wedding dress lot, and also made sure I had lunch).  We sorted all the clothes — a big box for the Project Safe thrift store, another big box to try to sell to a local vintage store, and a pile for me.  We sorted all the fabric — threw some away because it was too mildewed, put a lot in a box to donate, and kept some — and then started doing multiple loads of laundry, because everything (except for the $5 wedding dress lot) was musty and icky.

The Surprise

When we got home, we went through the fabric, and lo and behold! The brocade I had spotted was genuine silk. And not just one piece — there were four pieces, all beautifully woven with different designs. They’re each about 5 yards long. Online, this type of fabric sells for between $20 and $100 per yard. If we calculate $20 per yard, then I have about $400 worth of fabric here, just counting that silk and not any of the rest. And I bought it all for $6.  The unfortunate thing is that it has some irreversible stains from the mildew damage (thankfully, only over parts of it).

The Truth

Let’s look at this again. Mrs. [Smith] passed away last month, leaving behind over $400 worth of silk brocade, untouched, mildewing in her basement. I bought it for $6.

When you have something nice, something fabulous, don’t save it for “later.” That “later” is a myth. “Later” is after you forget it’s even there. “Later” is after it’s become a nest for mice. “Later” is when that $400 item sells for $6, six weeks after your funeral.

Now, I’m not saying that you shouldn’t have nice things. I think you SHOULD have nice things. I think life is so much more fun when you feel good about your clothes, when you have fun hobbies, when you look at the ceiling and see that 1925 chandelier so many times every day.

So, your good china? Use it. If you lose a couple pieces in the using, so what — at least you’ve enjoyed it. Your silk that you bought in New York in 2008? Cut it and stitch it already (I’m looking at you, Charity Everett). For cryin’ out loud, even Christmas candles — don’t pack them away year after year until they’re dusty and warped! Light them.

Because even if you live to be 93 like Mrs. Smith — later will always catch up to you.

Leaving you with this supremely cheerful thought, I’m going to examine my musty silk scarves again and try to figure out how to air them out so I can wear some of them next week.  While I’m on the subject, any suggestions for those? I know I can’t hand wash them, since even the damp made some of the colors run, and heaven knows I can’t afford dry cleaning for that many scarves right now.

Posted in Antiquing Adventures, Ruminating, Reminiscing, & Rambling | 2 Comments

The Best Black-Eyed Peas Recipe in the World

This is a ridiculous recipe (you know it is the instant you see “First Day . . . Second Day . . . Third Day”).  But it’s the very bestest recipe in the entire world for blackeyed peas. It’s from The Nashville Cookbook, published in 1976 by the Nashville Area Home Economics Association (an altogether worthy volume that exemplifies classic Southern cooking — indubitably a must-buy, if you can find it). These are on page 66.

Now, don’t be intimidated by the length of time these take to cook (it’s mostly hands-off). They’re quite easy — and cheap! — and they just require some planning.  I’ve made them a couple times for New Year’s Day (since all Southerners know that you must have black-eyed peas on New Year’s Day).  I’m making them right now, to have with cornbread in a couple days.  And I thought it all smelled way too good not to share. And by the way, these are, in my not-so-humble opinion, much better than the black-eyed peas that Cracker Barrel makes on New Year’s.  If you find a tastier peas recipe than this one, let me know — but I don’t think you will.

Southern Black-Eyed Peas

  • About 2 lb. ham shank (including skin and bone) — I used smoked ham hocks
  • 1/4-1/2 lb. smoked hog jowl (today, since Kroger didn’t have that, I used bacon)
  • 2 lb. black-eyed peas
  • 2 large onions, diced
  • 1 large green pepper, diced
  • 2 tsp. dry mustard
  • 1 tsp. salt
  • 1/2 tsp. black pepper

First day: Cover the ham shank and hog jowl with cold water in a 4-qt pot and boil gently for two hours or until the meat comes off the bone easily.  (It’s really good if you pull the meat off the bone, so you can include it in the peas later.) Chill overnight.

Second day: Skim off most of the hardened fat. Discard the fat, skin, and bones, reserving the liquid. Add dried, washed, black-eyed peas (removing the brown ones, pebbles, etc.) and soak them overnight. Use two pounds of peas to four quarts of water.

Third day: Add the remaining ingredients (onions, peppers, dry mustard, salt, and pepper).  Bring to a rapid boil, cover, and simmer three hours on low heat, stirring frequently.  The secret of the taste lies in soaking the beans in the ham-flavored liquid.

Note: This makes a huge amount (I found this out the hard way when I made them a couple years ago).  This time, I’m cutting the recipe in half and plan to freeze a lot of it.

Posted in Uncategorized | Leave a comment

Styling a $2.99 Dress Eight Different Ways for Fall

Today I went to Salvation Army to try to find a birthday present for my husband.  I was not successful in that.  As usually happens, however, I found something else: a $2.99 Ann Taylor knit jersey dress.

Ann Taylor dress from Salvation ArmyI’ve been dealing with early-morning wardrobe crises for the past few weeks.  As a fashion grad student, I feel a certain obligation not to wear T-shirts to class.  Summer was easy — I could throw on a maxi dress and some earrings and head out.  But, with very few of my dresses suitable for fall, I now have to think to put together an outfit.  Thinking is not my best function early in the morning.  So this afternoon I pulled out all my fall/winter clothes to evaluate.  And, since I obviously can’t wear this sleeveless number by itself when it’s 50 degrees outside, I decided to see how many different ways I could accessorize this dress.


I stopped at eight looks, although I could do several additional things with it (and would do an entirely different set for summer!).  This is just to demonstrate what you can do with one basic dress, a few cardigans, and some accessories.  If you have a limited budget and/or wardrobe space, here’s what you should look for when shopping:

  • A few simple basics — a pair of jeans, some camisoles, a couple of simple knit dresses (which, by the way, are excellent for traveling).
  • Traditional cardigans in several colors — if you shop carefully, you can find well-made classics that should last for years.  They can be worn with dresses, jeans, or skirts, and they look good every time.
  • Scarves in a variety of colors — multicolored scarves are most versatile and can tie together pieces in an outfit that might otherwise look mismatched.
  • Belts in a variety of colors.
  • A good assortment of costume jewelry.  You can accomplish a lot for a little money if you make it yourself — basic fishhook earrings and necklaces can be made easily with very little experience.
Posted in How-To, Money-Saving Tips, Mrs. Armstead's Household Guide | Tagged , , , | Leave a comment

Making Your Own Jeans — Not As Difficult As You Thought

Jeans made with McCall's 5894 Jeans that I sewed

I finished my first-ever custom made pair of jeans tonight! (They were finished enough to wear last weekend — pictured — but I hemmed them up a little more and added the rivets tonight.)

Custom made jeans

The rivets had not been added when the pictures were taken — and I’d also been wearing them all day and they’d stretched (more on that later).

Here are some tips, if you’re looking at making your own jeans:

Go try on some expensive jeans that are very flattering; take pictures and measurements.  You’ll want to pay particular attention to pocket placement.  To see why pocket placement makes a difference, you may want to visit this very enlightening blog post.

I used the McCall’s 5894 pattern.  It needed a bit of tweaking — it came up way too high in the front for my taste, and I moved it down a good inch or more at center front.  If you follow the fitting directions boldly, however, you should end up with a good-looking pair of jeans.  I have always had a problem with jeans gapping at the center back, so I took in the center back seam quite a bit. I also changed the curve of the crotch seam — I took it in more for a better fit.  I also had to let out the seam a little at the inner thigh, but take it in on the outer thigh.  Everyone’s fit will be different, so don’t be afraid to experiment with it — once you get it right, you can use the pattern over and over.

I had also bought the Jalie jeans pattern, but I found the McCall’s on sale for under a dollar at Joann’s and decided to go with that instead because it had more detailed fitting directions.  And, in reality, the fitting was definitely the most time-consuming part of this. Actually sewing them was a piece of cake.

Zippers and topstitching thread can be ordered at a very reasonable price from Wawak.  They also carry jeans buttons, but if you use their jeans buttons, you’ll have to add some denim “washers” — the post is longer than the button is deep.  For jeans buttons, there are a lot of really fascinating options on eBay — I even saw some from overseas that had a cameo on them.  Before you buy them, watch the Brian Sews video on buttons and make sure you’re getting the right kind (the first kind that I bought had an unfortunate tendency to pop off).

When topstitching, you’ll want to use the topstitching thread on the upper part of the machine and regular thread in the bobbin, with a heavy #16 needle.

Rivets — if you want to make your jeans look particularly professional — can be ordered in small quantities from Castbullet.com or in larger quantities from Grommet Mart (I ordered from Cast Bullet, but I have seen Grommet Mart recommended several places).  Definitely order quite a few more rivets than you think you’ll need — they take some experimentation to get right.

For help with installing rivets, the video from BrianSews is great.  However, since I already have a HomePro LR grommet setter — now discontinued — I bought a set of Home Pro rivet dies and set the rivets with that. (Thank heavens I bought things like grommet setters in high school, instead of the usual teenage stuff.)

I got my fabric from Fabric.com.  When looking for denim, pay attention to the weight of the denim (defined in number of ounces per square yard).  I used 10-oz. denim with 2% Lycra and was very happy with it.

If using stretch denim, though, make the jeans tighter than you think you need to.  I had mine fitting like a glove, and by the end of the day (when the pictures were taken) they felt baggy and later had to be taken in quite a bit more from just below the waistband almost to the knee.  This may also be because I decided to prewash my denim — but I think I’d rather prewash and take in, than to have them come out of the dryer an inch too short!

Have some fun with the pocket lining Jeans pocket detail— even though you’re the only one who will see it (or you can use it as an excuse to show off your jeans to all your friends).  I used some scraps of vintage green calico with white flowers.

Also come up with your own fun back pocket design (just don’t copy my skeleton keyhole!) — play around with some different stitch types on a piece of scrap denim.  This may be one of the only times that you actually use anything your machine for anything besides a straight stitch or zigzag!

I’m about to start a second pair of jeans with the same pattern — this time, I’m lowering the front and back by another inch, and taking the legs in just a bit more.  I’m also going to flip the placket the other direction — the pattern had it on the opposite side from the rest of my jeans.

I will tell you this:  Unless you’ve got $100 to spend on a pair of jeans, you can probably make your own faster than you can shop for a pair that actually fits.  And that’s why I made my own (well, that, and bragging may have been a factor, too).

UPDATE 12/11/13 — I’m working on the second pair, and decided to go for a curved (contoured) waistband rather than the straight one found in the pattern.  I simply traced the waistband of a worn-out pair of jeans that I already had, added seam allowances, and went with that. It worked like a charm. Advantages? I didn’t have to make a dart in the center back to compensate for my waist/hip ratio, the waistband hugs my body better, and the waistband doesn’t try to bend outward at the top like the straight one does.

Posted in The Lady's Workbasket | Tagged , , , , , , | 4 Comments

Avoid All the Billionaires: A Guide to Discernment for Free Kindle Fiction

Since my husband gave me a Kindle for Christmas almost two years ago, I’ve maxed out most of the good freebie classics and have been reduced to browsing the Top 100 Free Bestsellers on Amazon.com.  Sometimes, you find amazing stuff.  Sometimes, it’s not so great. Having read several of the not-so-great ones, I’ve developed a reliable system for judging a book by its cover.  (I know, I know, judging a book by its cover – but most of the time, you simply have to if you wish to ensure your own literary survival.)

Please note that, unless I indicate otherwise, I have made up all of the following titles. Some of them may exist in real life — if so, they are probably particularly unfortunate works of fiction.

The first, and most obvious, category is the Trashy Romance Book.  Once in a while, you might come across a good one. But there are many with no redeeming qualities. It appears that, with some of them, the author has spent more time in bed than in the schoolroom studying grammar. Here are some ways to spot the latter variety:

  • There’s any kind of billionaire involved.  For example, Heart of the Billionaire, Teasing the Billionaire, The Billionaire’s Desires, The Hot Body of the Billionaire (okay, so I made the last one up, but the others are actual titles). And now I just realized that I’ve probably just skewed my Amazon recommendations for all eternity by searching “billionaire.”
  • The title begins with the word “her” or “his”His Wild Bride, Her Forbidden Tryst — you get the picture.  This is also applicable to any possessive noun at the beginning of a title (Lucretia’s Secret Knight)
  • Any of the following words — or variations on these words — occur anywhere in the title: Tangled, surrender, bed, highlander (I have no explanation for that, but it’s true), forbidden, dare, innocence, lover, teasing (yes, with Teasing the Billionaire, we do have a double score), or dangerous (i.e., The Sheik’s Dangerous Lover. I swear, brain cells were killed in just reading the title).
  • There is a picture on the front involving only torsos — regardless of their state of dress or undress — with the heads invisible, cut off by the top of the page.

Another type frequently encountered is the Depressing Modern Literary Work.  This book is apparently designed to send the reader into a deep depression that can only be solved by consuming vast quantities of Cheetos.  Since I already have a problem with eating too many Cheetos, I find it best to avoid this type of book.  Here are some things to watch out for:

  • The title is exceptionally non-descriptive and/or abstract. Examples of this type could include:  The Color Blue, The Sound of Feathers, A Clear Glass Mirror, Waking Up Alone (all these titles were just made up by me, but I wouldn’t be surprised to find one or more of them in a search).
  • The title includes anything about a thread or threads.
  • The front cover depicts a shadow or silhouette.
  • The front cover depicts anything sitting by itself — i.e., a pair of shoes; a lit candle, or, worse, a burned-out candle; a blade of grass; a single bird in flight (assuming, of course, that it’s not a book about wildlife). Any item sitting by itself without a person in attendance is a dead giveaway.
  • The front cover depicts a highway leading to nowhere. While not infallible, this can be a sign that the book itself leads to nowhere.

Another type frequently encountered is a book spawned by a successful book.  This is The Cheap Imitation or The Literary Knockoff.  While identifying characteristics tend to shift with new popular titles, titles of this type may currently be identified by any of the following indicators:

  • A reference to “shades” or “gray” in the title.  You want to stay away from books like Eighty Shades of Gray or Fifty Shades of Black or Shades of Black and Blue.  Any titles written before the popular book, however, are exempt (The Picture of Dorian Gray, for example).
  • Any reference to vampires.
  • An actual book, discovered while researching, is A Shade of Vampire.  Hmmm.

Another popular category is The Cheap Fantasy Novel.  You may have one of these on your hands if you spot any or all of the following elements:

  • The title includes two words smushed together into one.  Examples could include: Lightbringer, Everflame, Shadowmoon.
  • Other key words to avoid include: Rise, light, fire, elemental, fall or fallen, sacred (assuming that you’re not shopping in the Religion section), legend, demon, souls, shadow, sword, moon, realm, truth, and mortal.
  • Any title that includes one or more of the above words with the addition of “of” is likely to be particularly awful.  Examples could include The Rise of the Fallen or The Shadow of the Realm.

Any of the above identification markers may be combined into a Hybrid Book.  Examples of hybrid books could include titles such as Samson’s Lovely Mortal (an actual title that I just found).  You see that the title includes both a possessive noun (Samson’s) and a fantasy keyword (mortal).  This classifies the book as a Trashy Romance/Cheap Fantasy Hybrid.

These are just a few of the identifying markers I’ve observed — what else have you noticed that I didn’t include?

Posted in How-To, Mrs. Armstead's Household Guide, Ruminating, Reminiscing, & Rambling | Leave a comment